
12 steps to register SBI Internet banking online
SBI Internet banking online: SBI, the country’s largest public sector bank, has more than 15,000 branches and a wide portfolio of products and services. SBI has five associate banks, State Bank of Bikaner and Jaipur, State Bank of Hyderabad, State Bank of Mysore, State Bank of Patiala and State Bank of Travancore.
SBI’s strong infrastructure protects the banking services of all 15,000 branches in India. Here, we take a look at SBI Net Banking to know more about the registration process, how to log in, transfer money, check account balance, etc.
Net banking is a revolutionary step for the banking industry. Passbook printing, cash withdrawal, demand draft preparation, check-book application, etc. can be done easily through SBI Net Banking. Nowadays, your debit card is protected by a certificate and OTP (One Time Password) to protect the money of the holder of the net banking account. In this article, we will explore how to enable Net Banking at SBI to perform several tasks online.
How to register SBI Internet banking online
12 steps to register for the Internet banking facility:
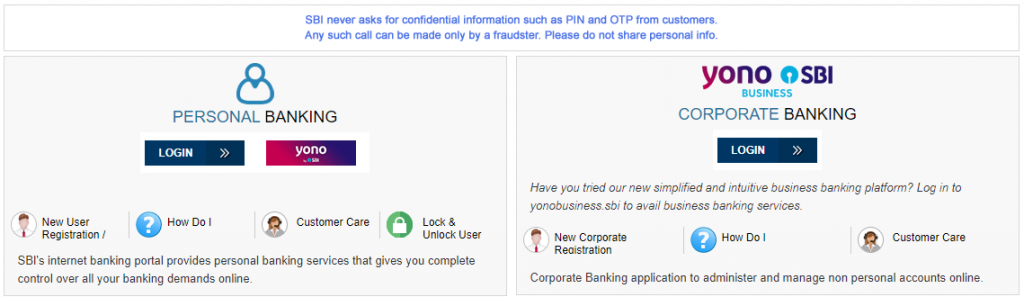
Go to www.onlinesbi.com
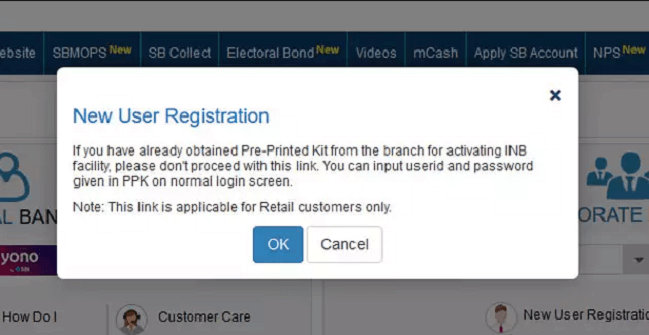
Click on ‘New User Activation/Registration’. A pop-up will appear on your screen asking you to ensure that you have not already obtained the Internet banking kit from the branch. Click ‘Ok’.
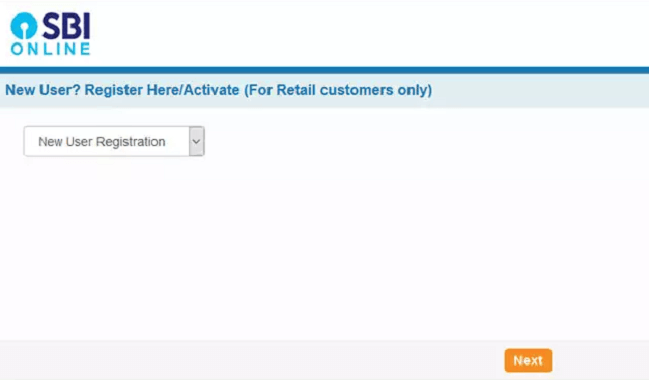
A new tab will open on your screen. When you first register yourself, select ‘Register a new user’ and click Next.
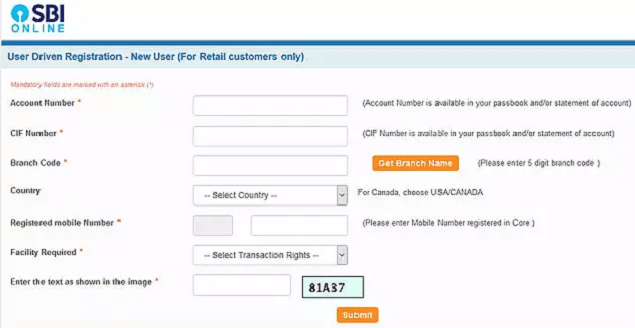
SBI Net Banking register Step-3
A new page will open on your screen where you will be filled up to your details. You will have to enter your account number, CIF number, five-digit Branch code, select country, enter registered mobile number, select the required facility, and captcha code. You can find your account number, CIF number details, and branch code on the front page of your passbook.
Click on ‘Submit’ after filling up and checking that all the details mentioned by you are correct or not.
Upon successful submission, a one-time password (OTP) will be sent to your mobile. Enter OTP and click Confirm.

Select the ‘I have an ATM card (register online without visiting branch)’ option and click to submit. You will need to enter your ATM card details and captcha code. Click to submit.
Upon successful submission, your temporary username will appear and you will be asked to create your login password. Make sure you securely enter this temporary username. Re-enter the password and click submit.
–
The password must be at least 8 characters long and must be a combination of upper and lower alphabets and at least a number and a special character should be added.
Once you have successfully entered the login password, you will be advised to login to internet banking services one hour later according to SBI Call Center. This will ask you to create a new username of your choice. Select the checkbox to accept the terms of Internet Banking. Click the submit button to go next step.
You will be asked to create a new login password and profile password. Note that these two passwords are different. Also, you need to select the secret question from the list and provide answers that can help you in case you forget your password in the future.
Enter your date of birth, place, and country of birth and mobile number as registered in the bank records.
Click to submit. Once these details are saved, you can use the internet banking facility.